Monday, July 18, 2011

Farm to Plate Dinner at Kruger's Farm

Go down the dusty road, just past the market.
Park in the field in the back and then walk over to the immense old oak tree.
*Grand, isn't it**Looking out over the raspberry bushes which are
producing a bumper crop this season*
{delicious}
Command central
{Culinary creation station}
Just as we arrive, the lamb gets laid on the grill.
The aroma is Amazing!
Farmer Don is answering some questions.

Lori Emch of Tasteful Catering
produced an impressive menu.

Opener

Sandra's Pickled Vegetables

Olympic Provisions Cured Meats


Farm fresh eggs, poached with mussels, cream,

and a hint of curry-served on Ken's Artisan Bakery toast.

*It tastes even better than it looks, trust me*

*I was going to take pictures of everything but...

I was too busy enjoying all of the good food and the excellent conversations*


Fresh greens from the garden, with Rogue River Blue,fresh blueberries, local walnuts, and a raspberry honey mustard vinaigrette.

Entrée

Grilled Leg of Lamb from Sudan's Farm marinated in a rosemary, lavender, garlic, stone ground mustard,

pinot noir, and blackberry confit.

Cedar Planked Salmon with brown sugar, orange, and Walla Walla onions.

Topped with sugar snap peas and pea tendrils.

Served over Zursun Idaho Heirloom Black Beluga Lentils,

apple wood smoked bacon, and date puree.

Kruger's slow roasted beets with local goat cheese & horseradish

Roasted baby carrots.

Finish

Italian Almond cake from the Dessert Tray (that's us!)

with Kruger's blueberries, raspberries, and blackberries

and a Goat's Milk Tres Leches sauce.

Here's Lori coming around with more lamb.
There's blue sky! Look quick ;)
Miss "I don't like beets" is willing to give them a try... albeit reluctantly.*She discovered to her surprise that she liked them.*

It's clouds.
It's Sun!
It's clouds.
It's Sun!
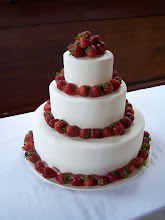
The cake, like everything else, disappeared too quickly for me to
get a beauty shot of it so here's one from a previous dinner.
Just change out the strawberries for some blackberries & raspberries,
and replace the whipped cream with the goat's milk tres leches reduction.
(I need to ask Lori for the recipe for that, it paired nicely with the cake.)

Thursday, July 14, 2011

Crepes

Currently I am on a serious Crepe bender. I haven't made them for years, then a couple of weekends ago I made a batch for breakfast and... have made four more batches since.
Note-They freeze really well.

Mostly I have been eating them with fresh Tazberries, which kind of look like a red blackberry, and some chocolate spread. Mind you, I thought I was buying a different brand of chocolate hazelnut paste from the usual variety because I know it exists. Trader Joe's had an excellent version because it wasn't as sweet and had more of a cocoa flavor but the last time I went to pick some up, it was no longer available.
(NOOOOOOOOOOOOOOOOOO!!!!!!!!!!!!)
The one thing that drives me crazy about Trader Joe's is how
they carry some items for a long time and then one day...
*POOF*
Nothing.
"The greatest trick the Devil ever pulled was convincing the world he didn't exist.
And like that...he's gone."Roger Kint.

Anyhooo, I've found many recipes out there for the sweet style of crepe, road tested a few, then came up with my own hybrid version.

Crepes are essentially really thin pancakes and almost every country has some version, whatever name is it goes by.

So, here's mine with a few in process pictures to give you an idea of how simple and fast they are to make. It can be a little tricky getting the timing right while cooking but the results are well worth the effort.
*Mmmmmmmm, crepe.*

Steampunk Baker's Crepe recipe
(no gears added)


1 cup AP flour or white whole wheat pastry flour.
1 tsp Sugar, I use evaporate cane sugar because I like it.
1/4 tsp Kosher salt
1 cup 1% or 2% milk. *
3 Eggs, large. **
2 Tbsp Unsalted butter, melted & cooled. ***

*You can also use whole milk or replace part or all of it with something like hemp milk which is what I did in the last batch I made. You can use water too but other stuff has more flavour.
**I have seen recipes using one and others using four which gets too eggy in taste for me.
***A friend's recipe uses olive oil which works nicely as well.

So, first step.
Gather up your Mise en Place...means stuff you need: ingredients, bowls, spatulas, stove, etc.
Combine the flour, salt, and sugar and set aside.

In a separate bowl, whisk the eggs together.
Then slowly whisk in butter until fully incorporated.
Then pour in the milk and whisk until combined.
I know a lot of recipes such as pancakes say to blend in the butter
after you combine the eggs and milk.
I've done that...You know what happens almost every time?
The butter solidifies!!!
Then there are little mini butter lumps floating in the liquid and batter.
Drives me bonkers.
However, if you mix the butter in before adding other liquids,
the butter will meld with the eggs because eggs have the nifty trick of being able to
incorporate a large amount of fat into them IF DONE SLOWLY!!!
The main reason that Hollandaise can be so hard to make sometimes i
s
because people pour the fat into the eggs way too quickly
and it breaks the suspension effect.
(Still fixable if you are careful though.)


*Now back to the recipe*

Pour half of the liquid mixture into the flour mix and whisk until fully incorporated.
*Poured*
*Whisking*
*Whisked*

Add the rest of the liquid mixture and whisk until completely blended.
*It should pour like a thin soup*
You don't need to worry about over mixing crepe batter. There is so much liquid that gluten can't develop enough bonds to make the batter tough and dense like it can with pancakes.
I haven't tried this with other flours yet but many should work because Buckwheat flour is often used when making savory crepes and it's gluten free.

This process can also be done in a blender or with a hand mixer but let the batter rest, refrigerated, for about an hour after to let the air bubbles dissipate. The batter is so easy to mix with a whisk that I never bother with the machines.

Looking ready to go.
I recommend having a very slick non stick skillet-makes life sooooo much easier.
*Let me just say, Non Stick equals easy.*
I actually picked up a non stick crepe pan years ago but even a well seasoned cast iron skillet can work just fine.
It also means that you may not need to put any oil or butter in the pan before cooking. If the first test crepe sticks, then you will need to add some oil or butter to the pan.

Pour a very small amount of batter into the pan to test if the pan is ready. Swirl the pan around very quickly to spread out the batter.
*Takes a little practice but once you get the hang of it, it's a breeze.*

The crepe should get a hint of color on one side fairly quickly, then flip and let the other side cook for a little less. As for how much colour, that is up to you, I prefer it on the lighter side of golden.

You are ready for some serious crepe action now.
The crepes will cook off fairly quickly so be ready to swirl the pan once you pour the batter in so it spreads evenly over the whole pan.

As for how much batter to use, it depends on the size of pan. I usually use a little over 1/4 cup but I'm using a large ladle so I just kind of eyeball it as I go...so sometimes the crepes are a little thicker than other times. C'est la vie.

Crepe in situ.

Fin.
Hmmm, I believe it is time to partake of another crepe.
[Fork in hand]
Mmmmmmmmmmmmmmmm.

Wednesday, July 6, 2011

Crazy cat lady moment

It's hot...
Well, for here it's hot...which must mean Summer has officially arrived to the Northwest.
I'm a moderate Summer kind of person which means mid 70's with a few clouds amiably floating along.

Warmer than that and my brain turns to goo, which it has...so, rather than listen to me blather on mindlessly
(see goo reference and I am so glad I don't live where 100+ temps are the norm)
I will post pictures of my felines in all of their cuteness...which mostly means napping.

I do actually have a few posts in mid writing (crepes are featured in one) but I am waiting to take a couple of pictures for some and some extra free time to finish writing the others (another thing about Official Summer in the Northwest-lots of weddings).

Now on to the furry ones!

I call this one 
"Tawny in repose" 
or "Clean Sheets that I must immediately lay claim to"

 This one would be Scarlett
"I'm trying to NAP up here!"


"Why yes, I am extremely photogenic. Why do you ask?"
 "Zoom! Even while I sleep."

That is all of the crazy cat lady action I will thrust upon you today. 
Just consider this to be a cute interlude.

Monday, June 13, 2011

Pineapple Upside Down Cake

I was in a large box store a couple of days ago and saw its version of Pineapple Upside Down Cake and I was, to put it mildly, less than impressed.
*I will shorten the cake name to PUD for ease of typing for the rest of the blog.*
Pud-hehehehehehehe.

Once in a while, I am perfectly happy (don't tell anyone at work) with one of those grab and go cakes but sometimes...sometimes...

How do I put this politely? Some of them are really...abominations of the baking world! The look, the texture, the taste.
There, I've said it and I stand by it.
(Check out the Cake Wrecks blog and you'll begin to grasp the levels of horror that bakers can descend to.)
The PUD I saw was a solid burnt brown, you couldn't tell what part was cake and what part was pineapple-at least I think it was pineapple. Seriously, not appetizing.

Besides, it is really not that hard to make PUD at home and even easier if you choose to use a cake mix.

A lot of recipes will have you use canned pineapple which is fine but I prefer to use fresh. Every now and then I get a random desire to buy and eat a pineapple by itself but then I never quite get around to eating it all and I don't want the rest to spoil so this puts the remainder to a good use.

First thing you need?
Cast iron skillet. The older I get, the more I think it really is the only pan you need. Even heat, non stick surface once you get it well seasoned, excellent for grilled cheese sandwiches.
You don't have to have one but it's very versatile.
Tip-If you use flax oil for seasoning, it's supposed to work extremely well and be a very durable seasoning agent. Cooks Illustrated had a note about it.

Oven:350 degrees.

Ingredients:
Topping:
4 Tbsp Unsalted butter
2/3 cups Brown sugar
1 Pineapple:peeled, cored, and cut into small chunks. Approximately 4 cups.

Cake:
8 Tbsp Unsalted butter
1 cup AP flour
1/2 cup Whole wheat pastry flour (can use plain whole wheat flour but the pastry is finer).
1 1/2tsp Baking powder
1/2 tsp Salt-I use Kosher because I like the flake, use less if you use regular table salt.
3/4 cup Sugar-I like to use raw cane sugar; I like the texture and it has a better flavor to me.
2 each Eggs, large
1 each Egg white
1 tsp Vanilla, though I think a little rum works well too.
1/3 cup Milk, I use 2% usually but use whatever is on hand except for skim or if you choose to use that up the butter by 1 Tbsp.
Optional: Some spices such as cinnamon or cardamom depending on what you like.
Topping:
On a stove top over low to medium heat, heat the skillet to melt the butter, then stir in the brown sugar.
Spread out evenly in the pan with a spatula, then lay the pineapple chunks out evenly on top of the sugar mix.

Cake:
Combine the flours, B. powder, and salt in a bowl. In another bowl, using a mixer on medium speed, beat the sugar & butter together until light & fluffy about 3 to 6 min. Beat in the eggs and white, one at a time until combined-about 30 seconds. Mix in vanilla.

Reduce the mixer speed to low, add 1/3 of the flour mix and then half of the milk, mix until just combined. Add half of the remaining flour mix and the rest of the milk, again mix until just combined. Add in remaining flour mix. The batter will be thick.

Spread the batter evenly over the pineapple mixture and smooth out the top. Tap the pan a little to release extra air bubbles. Bake the cake until done. Check by inserting a toothpick, when it comes it comes out clean, pull out of the oven. Approximately 45 min.

Now, that's some cake!

Before flipping, another glamour shot.

Having said that, on to the flipping part.
*Use caution, hot melted sugar on body parts HURTS!*

So, let the cake cool for about 10 min. Place an appropriate size plate over the cake.
Using hot pads!!! flip cake & plate over and then let the cake sit for a minute or two until it releases from the pan. Don't try to shake it loose. After it's released from the pan, remove the pan and let the cake cool before serving...if you can.

See how pretty it can be.
Yummmmmmmmm...now where's my fork?

Sunday, May 29, 2011

If you got 'em, smoke 'em.

Yes, I have been ultra lazy lately.
Also, I'm easily sidetracked,
working on some more Steampunk Baker things,
though some of the sidetracking does actually involve official work stuff.
*I swear it really does.*


Anyhow, here is one of the recent special cake requests
that we received
for a man who likes his cigars.Just don't try eat the wrong one or it will be a little crunchy
with a strong hint of tobacco.

Tasty cigar action close up.
My talented pastry chef painted all of this by hand.Side by side.

Well, if Tom is anything like George Burns on the
cigar smoking, then we'll see him for many more years to come.

Monday, May 9, 2011

Monkey Bread recipe

Vegan style.
(sigh)
No, not Vegas,
Vegan-and it's really good too.

Really! I would not lie to you...
(okay, so that time in Paris maybe wasn't a complete account of the truth but that's a completely different matter).
*ahem*

Hey, don't walk away! I know, I know...
You're thinking how can this be possible?
Delicious and vegan in the same sentence, much less in one recipe?
"INCONCEIVABLE!"
Vegan is synonymous with all that is not tasty. Right?
Sure, main courses, salads and the like can be vegan and relatively edible but baked items? Desserts? Not possible.
"INCONCEIVABLE!"
" You keep using that word. I do not think it means what you think it means."


Well... hate to burst that bubble but some of those desserts and baked goods can be just as good as their non vegan counterparts and no extra mysterious magic or artificial ingredients are required.

Granted, when it comes to baked goods, especially desserts-one does have to let go of some preconceived notions of what you expect the desserts to be like. For example, the vegan "whipped cream" filling in the vegan banana cake will not taste like the regular banana cake using real whipped cream-doesn't make it better or worse, just different, and once your mind opens to the possibilities then your imagination can run wild.

Really I promise, it is possible. Our vegan chocolate cake with vegan peanut butter frosting is soooooooo good and our baker has been making some vegan scones (assorted flavors) that are definitely worth trying.

Yes, yes, I admit there are many vegan desserts and baked goods out there which claim to be "good" (and I have sampled a fair selection of them) but many of these leave you wondering if:
a: You have just done a trek through the Sahara desert
b: If the person who made the dessert had any concept of what "delicious", much less "edible" meant when making the dessert/baked good.

I tasted a vegan chocolate frosting once that tasted like a burned marshmallow, I mean REALLY burned. Not good! Not good at all.


Anyhow, here's the recipe-hope that you enjoy.
I made this side by side with the basic sweet dough from America's Test Kitchen which is my overall favorite base dough. I still love that one but I think the vegan is a little more tender and lighter in texture and flavour.

Dough:
1 package active dry yeast (or appropriate amount of Rapid rise or fresh).
3 cups Wheat flour ( I use 2 to 2 1/2 cups all purpose and whole wheat pastry for the remainder)
1 tsp kosher salt
1 tsp cinnamon (sometimes I up it a little, depends on my mood)
*1/4 tsp clove
*1/4 tsp ginger
*1/4 tsp nutmeg
*1/4 tsp cardamom
1/4 cup sugar (I use organic cane sugar)
1 cup almond milk (other nut, soy, or hemp milk can be used as well)
**1 to 3 tsp vegetable oil

*These spices are optional to add.
**Because a regular sweet dough tends to have fat from butter and/or buttermilk/milk which helps tenderize the dough, a little vegetable oil will help do this with the vegan dough. The amount you need varies because it depends on how dry the whole wheat flour is-sometimes you need a little more, sometimes less. You can add a little more of the "milk" if the dough is dry as well.

Coating:
*1/2 to 1 cup vegan margarine. Unsalted Saffola or Earth balance margarines work well.
1 cup packed brown sugar
1 Tbsp cinnamon (adjust quantity to taste)
1 cup pecans (or other nut of choice)
1 cup raisins (optional-I know some people like raisins cooked in things, I don't. By themselves fine, baked in stuff...abomination of nature (but that's just my opinion)).

*I find that I don't need as much so I usually lean towards the 1/2 cup.

Oven 350 degrees
Bundt pan: Sprayed with a non stick pan spray
Total Time: Depends. I'll explain why in the instructions.
Baking time: Approximately 25 to 30 min. (Again, depends on your oven, how warm the dough is going into the oven, etc.)

Warm almond milk to lukewarm (approximately 110 degrees), add yeast and let sit for 5 min.
While the yeast is re hydrating, place the dry ingredients in the bowl of a stand mixer, stir to combine. Attach a dough hook, pour in the yeast mixture, add the oil and turn mixer on to a low/medium speed. Let the mixer run for 5 to 7 min to knead.
Add a little flour if the dough is too sticky to keep it from sticking to the mixer bowl or, if it's a little too dry then add just enough liquid until everything combines as it mixes.
Pull dough out and place in a greased bowl.

Now, when I make this dough, at this stage I cover it with plastic wrap and immediately put it into the refrigerator to rest overnight-the dough will slowly continue to rise overnight (this process is call retarding the dough) and become more flavourful.
I finish making this recipe in the morning, pulling the dough out of the fridge first thing in the morning and letting it come up to room temp. The warmer the ambient room temperature, the faster the dough will warm up.

While it's warming up, I make the recipe for the coating. I melt the margarine, mix it with the other ingredients, and set aside until needed.

When the dough has warmed up, roll it into small balls, approximately 1 to 2 in in diameter, then roll them in the coating. Place the balls into the Bundt pan while sprinkling pecans over the dough.
Pour any remaining coating mixture over the dough in the Bundt pan, then set in a warm spot and let the dough rise until approximately doubled in size.
Put the dough into oven and bake until done.

Sunday, April 24, 2011

Short yet sweet

Keeping it simple this week.
Some of the stuff that we've been making recently.
Shortbread flowers
(Something bright and colorful to make up for all of the rain.)

Lemon tarts
Working on hundreds of mini Eclairs.
Fresh Fruit Tarts.
Seems like a good way to get one's daily serving of fruit to me ;-)